

In this article, we will learn about creating reusable components in React. We can reduce the code that we need to write and most prominently reduce our code’s redundancy. When creating a separate component that can be used in many components but also with some features particular to the components that are using it. This would allow us to add more flexibility with less redundant code.
Let’s get started by creating a simple demonstration that would help us learn the basic things that we need to keep in mind along with a simple scenario so that we can focus more on the basic requirements rather than taking a complex scenario and revolving around to understand that scenario.
The demo that we will work with has a generic component that we will reuse, which is the Generic Component. The generic component contains a text field and a button, on click of the button the value in the text field will be shown and if any changes will be made in the input field the text will disappear and will re-appear on click of a button.
What does reusing a component really mean?
Reusing a component is generally writing a piece of code that can be either a functional component or class component when working with react and then using that component’s instance multiple times wherever we want. We will go through creating a reusable component and then re-using that component in two other components. While we learn to work with the reusable components, we will also look around some of the best practices that according to me can help us build more proficient components.
Setting up project
While creating a demo for creating a reusable component in React I used an online playground that is Stackblitz. Stackblitz is an online playground for creating various projects one of which is React using JavaScript.

This is the homepage that you will see after you log in or create your account if not already a member. I selected the react with JavaScript project for the demo. You can select as per your requirement such as React with typescript project, but it will require some code changes relevant to typescript as I have used JavaScript project.
If you are using your local system for creating a project then use the command
npx create-react-app react-reusable-componentRunning this command will create a boilerplate react project. You can start with that project to understand the concept of reusing components.
Demo
Implementation
Let’s start with the entry file “index.js”, which will be the first file to load.
import React, { Component } from "react";
import { render } from "react-dom";
import "./style.css";
import Category from "./Category";
import Attribute from "./Attribute";

class App extends Component {
  constructor() {
    super();
  }
  render() {
    return (
      <div>
        <Category />
        <hr />
        <Attribute />
      </div>
    );
  }
}

render(<App />, document.getElementById("root"));
index.js
We import our “category” and “attribute” components in our index.js file so that we can render the HTML of both components. The contents of both components are separated by a horizontal line.
Now let’s have a look at the code of our generic component that we will import into the required components. We will create a file named GenericComponent with the elements that we want to reuse. In our case, we have added an input field of type text and a button with onclick event.
import React from "react";

export default function GenericComponent(props) {
  const handleChange = () => {
    console.log("HANDLE CHANGE CALLED");
  };
  return (
    <div>
      <span>GenericComponent</span>
      <br />
      <input type="text" onChange={props.handleChange} />
      <div style={{ paddingTop: "10px", paddingBottom: "10px" }}>
        <button onClick={props.handleClick}>Show Text</button>
      </div>
    </div>
  );
}
GenericComponent.js
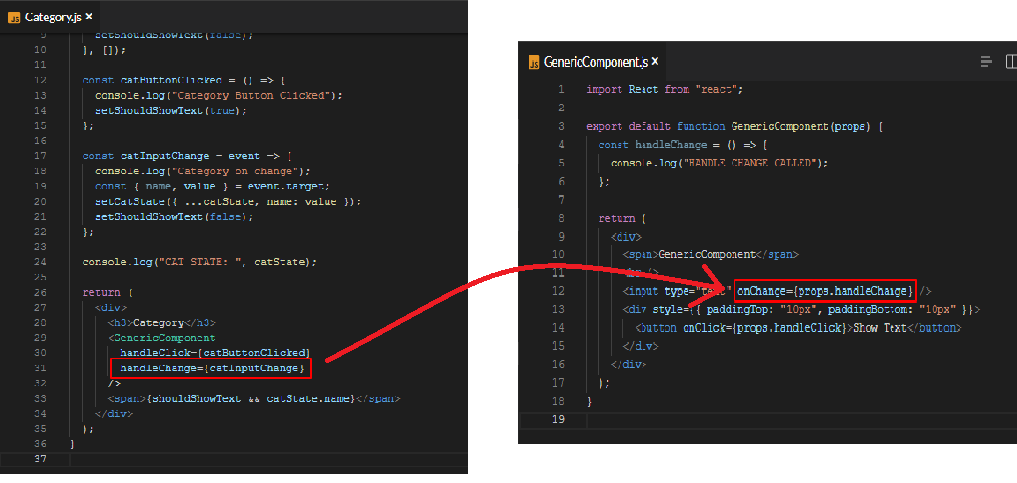
As we can see in the code above that the onChange event of the text field uses a method from props that we pass when using a generic component.
import React, { useState, useEffect } from "react";
import GenericComponent from "./GenericComponent";

export default function Category() {
  const [catState, setCatState] = useState({});
  const [shouldShowText, setShouldShowText] = useState(false);

  useEffect(() => {
    setShouldShowText(false);
  }, []);

  const catButtonClicked = () => {
    console.log("Category Button Clicked");
    setShouldShowText(true);
  };

  const catInputChange = event => {
    console.log("Category on change");
    const { name, value } = event.target;
    setCatState({ ...catState, name: value });
    setShouldShowText(false);
  };

  console.log("CAT STATE: ", catState);

  return (
    <div>
      <h3>Category</h3>
      <GenericComponent
        handleClick={catButtonClicked}
        handleChange={catInputChange}
      />
      <span>{shouldShowText && catState.name}</span>
    </div>
  );
}
Category.js
When we make any changes in the input field, catInputChange() will be called that we have defined in the same component. We have defined the change handler in the same component as we can implement the functionality as per the component such as setting the state of the component so that we can use the state value for other purposes. Similarly, we have defined the attrInputChange() method that will handle all the input changes.
import React, { useState, useEffect } from "react";
import GenericComponent from "./GenericComponent";

export default function Attribute() {
  const [attrState, setAttrState] = useState({});
  const [shouldShowText, setShouldShowText] = useState(false);

  useEffect(() => {
    setShouldShowText(false);
  }, []);

  const attrButtonClick = () => {
    console.log("Attribute button clicked");
    setShouldShowText(true);
  };

  const attrInputChange = event => {
    console.log("Attribute on change");
    const { name, value } = event.target;
    setAttrState({ ...attrState, name: value });
    setShouldShowText(false);
  };

  console.log("ATTR STATE: ", attrState);

  return (
    <div>
      <h3>Attribute</h3>
      <GenericComponent
        handleClick={attrButtonClick}
        handleChange={attrInputChange}
      />
      <span>{shouldShowText && attrState.name}</span>
    </div>
  );
}
Attribute.js
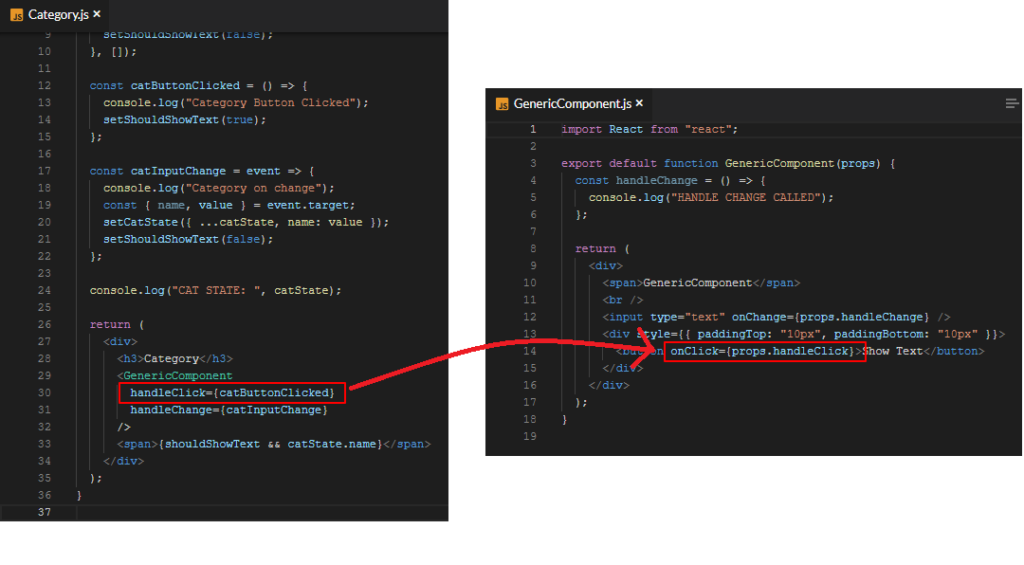
For adding events like onClick event for the button, we use an event from the props. When we will click the button, an event from the props will be called that will be defined in the component itself. For example, when we will click the button in the category component then it will call “catButtonClicked” defined in the category component.
When seeing the final results of using the generic component, it will be something as
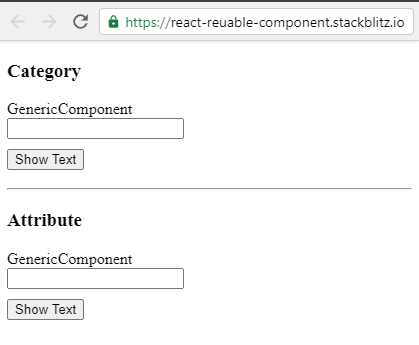
Demo
Summary
After reading this article you will have a good understanding of the basics of reusing any component let it be for designing purposes or for functionality purposes. We can add more reusable code in our generic component which can include styling, custom attributes, events, values, and many more things.
![]()


