

In the dynamic world of web development, building robust and efficient applications requires choosing the right tools and technologies. One such powerful combination is creating a React app with TypeScript. This article will provide you with a step-by-step guide on how to create a React app using TypeScript, ensuring type safety and enhanced code quality. Let’s dive into the process while incorporating essential SEO keywords for better visibility.
Setting Up Your Development Environment
The first step is to ensure your development environment is ready for the project. Install Node.js and npm (Node Package Manager) if you haven’t already. Once installed, you can proceed to create your React app.
Setting up your development environment is the crucial first step before you embark on creating a React app with TypeScript. A well-configured environment ensures a smooth and productive development process. Here’s a detailed breakdown of the steps involved.
Install Node.js and npm
Node.js is a JavaScript runtime that allows you to execute JavaScript code outside of a web browser. npm (Node Package Manager) is a tool that comes bundled with Node.js, enabling you to easily manage packages and dependencies for your projects.
Download Node.js
Visit the official Node.js website (https://nodejs.org/) and download the LTS (Long-Term Support) version suitable for your operating system. LTS versions are recommended for stable and production-ready environments.
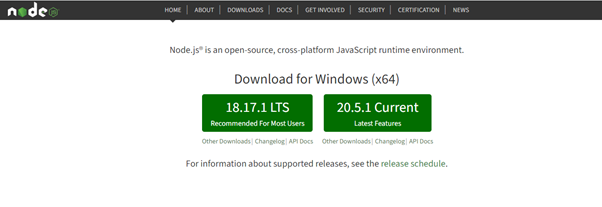
Install Node.js
Run the installer and follow the prompts to install Node.js (https://nodejs.org/en). This will also install npm automatically.
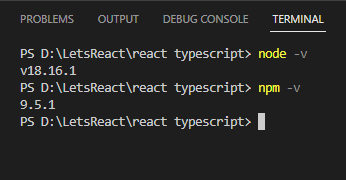
Verify Installation
To confirm that Node.js and npm are installed correctly, open your terminal or command prompt and run the following commands:
node -v
npm –v
Benefits of React with TypeScript
Before we dive into the technical details, it’s important to grasp the benefits of combining React and TypeScript. TypeScript, a superset of JavaScript, introduces static typing to your codebase, which enhances early error detection and improves code maintainability. React, on the other hand, provides a declarative approach to building user interfaces. The combination of these two technologies offers a powerful development experience.
One of the key advantages of TypeScript is its ability to provide type annotations to variables, functions, and components. This helps catch type-related errors during development, reducing the chances of runtime issues.
Creating a New React App with TypeScript
Creating a new React app with TypeScript is a foundational step that sets the stage for your development journey. The process involves using the create-react-app command, a tool that streamlines the setup process by generating a scaffolded project with the necessary configurations. Here’s a detailed breakdown of the steps involved.
Installing the create-react-app Tool
Before you can create a new React app with TypeScript, you need to have the create-react-app tool installed globally on your system. This tool simplifies the process of setting up a new React project by handling the intricate configuration details for you.
Open Your Terminal or Command Prompt
To install the create-react-app tool, open your terminal or command prompt. Enter the following command to install the create-react-app tool globally:
npm install -g create-react-appThis command installs the tool globally on your system, allowing you to use it from any directory.
Creating Your React App
With the create-react-app tool installed, you’re ready to create your new React app with TypeScript. This step involves running a command that initializes a new project and sets up the basic project structure.
Navigate to the directory where you want to create your React app using the cd command. For example:
cd path/to/your/directoryRun the create-react-app Command
Enter the following command to create a new React app with TypeScript:
npx create-react-app my-typescript-app --template typescriptIn this command, replace my- typescript-app with your preferred project name.
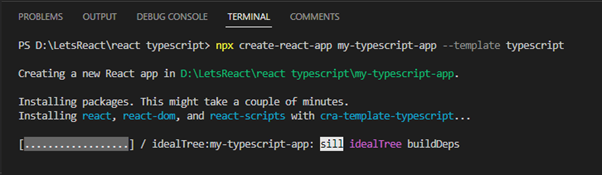
The command will initiate the creation process and install the necessary dependencies. This might take a few moments.
Exploring the Generated Project Structure
Once the installation is complete, the create-react-app tool will generate a basic project structure for you. This structure includes essential files and directories that form the foundation of your React app.
Navigate to Your Project Directory
Use the cd command to navigate into the newly created project directory:
cd my- typescript -appReview the Project Files
Explore the project structure using your code editor. You’ll find files like src/index.tsx (the main entry point), public/index.html (the HTML template), and src/App.tsx (a sample component).
Starting the Development Server
With the project set up, you can now start the development server to view your React app in action. In the terminal, enter the following command to start the development server:
npm startThis command will compile your TypeScript code, bundle it, and open the app in your default web browser.
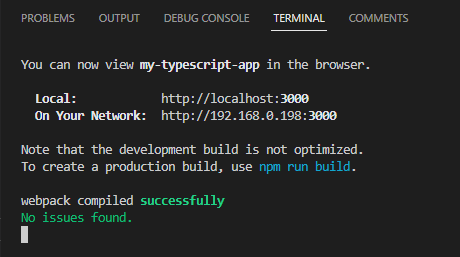
View Your App
Once the server is up and running, open your browser and navigate to http://localhost:3000. You should see your React app running.

Project structure of the Typescript project
The project structure of a React app created with TypeScript using the create-react-app tool follows a specific layout that helps organize your code and assets efficiently. Below is a breakdown of the key directories and files you’ll find in the generated project structure:
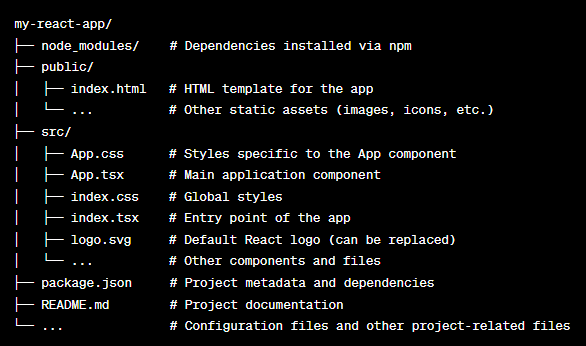
Here’s a more detailed description of each key element in the project structure:
- node_modules/: This directory contains all the third-party packages and dependencies installed using npm. It’s automatically generated when you install dependencies for your project.
- public/: This directory holds static assets and the main index.html file, which serves as the template for your app’s HTML structure.
- index.html: The main HTML file that serves as the entry point for your app. It includes placeholders for dynamically injected content like the app title and the root element where your React components will be rendered.
- src/: This is where most of your application code resides.
- App.css: CSS file containing styles specific to the App component.
- App.tsx: The main component of your app. You’ll define the structure and behavior of your application here.
- index.css: Global CSS styles that apply across the entire app.
- index.tsx: The entry point of your application. It renders the App component into the designated DOM element.
- logo.svg: A default React logo image. You can replace it with your own logo or other assets.
- Other components and files: You can create additional components and organize them within this directory.
- package.json: This JSON file contains metadata about your project, including its name, version, description, scripts, and dependencies. Read more about package.json file here.
- README.md: A markdown file containing documentation and information about your project. It’s often used to provide instructions for running the project and other essential details.
- Other Files: There might be additional configuration files related to tools, testing, and other functionalities you choose to integrate into your app.
Summary
In this concise guide, we explore the process of creating a robust React app using TypeScript. By combining the power of React’s UI-building capabilities and TypeScript’s static typing, developers can enhance code quality and maintainability. We delve into the steps of setting up your development environment, installing necessary tools, and utilizing the create-react-app command to scaffold a project with TypeScript. By following this guide, you’ll be well-equipped to embark on your journey to building modern and reliable web applications.
![]()


