
In the world of modern web development, building robust and user-friendly forms is an essential part of creating a successful application. Users expect seamless interactions, instant feedback, and efficient data handling. React Hook Form comes to the rescue as a powerful library that simplifies form validation and state management, enabling developers to streamline their form-building process.
In this comprehensive guide, we’ll explore React Hook Form and dive deep into its features and capabilities. Whether you’re a seasoned React developer or just starting with the library, this article will equip you with the knowledge and tools to handle complex forms effortlessly.
We’ll begin by understanding the fundamental concepts behind React Hook Form and why it has become a popular choice among developers. We’ll also highlight the advantages it offers over other form management libraries, emphasizing its lightweight nature and high performance. For more information, check out the official website of React-hook-form.
How popular is React-hook-form
Analyzing the data from the last 5 years for react-hook-form, formik, and react-final-form, it is evident that React Hook Form has emerged as the most widely adopted library for form management in React applications. Its popularity has surpassed that of Formik and React Final Form, making it the preferred choice among developers when working with forms in React.

Getting Started with React Hook Form
Getting started with React Hook Form is a straightforward process that involves installation, setup, and basic usage of the library. React Hook Form (RHF) is designed to be lightweight and unobtrusive, making it an excellent choice for managing forms in React applications. In this section, we’ll walk you through the steps to get started with React Hook Form.
Installation
To begin, you need to have a React project set up. If you don’t have one already, you can create a new React project using create-react-app or any other preferred method.
Once you have your React project ready, you can install React Hook Form and its peer dependencies using a package manager like npm or yarn. Open your terminal or command prompt and navigate to your project directory. Then, run the following command:
npm install react-hook-formImporting the Library
After installing React Hook Form, you can start using it in your project. To do that, you need to import the required functions from the library. Typically, you’ll need to import the useForm hook, which is the heart of React Hook Form and provides access to the form methods and state.
import { useForm } from 'react-hook-form';Creating the Form
With the library imported, you can create your form using regular HTML form elements along with the appropriate RHF attributes for validation and form control. You’ll use the useForm hook to initialize the form and get access to its methods and state.
const MyFormComponent = () => {
  const { register, handleSubmit, formState } = useForm();

  const onSubmit = (data) => {
    // Handle form submission here
    console.log(data);
  };

  return (
    <form onSubmit={handleSubmit(onSubmit)}>
      {/* Form fields go here */}
      <input type="text" {...register('firstName', { required: true })} />
      <input type="text" {...register('lastName', { required: true })} />

      <button type="submit">Submit</button>
    </form>
  );
}
In the example above, we’re using the register function to associate form inputs with RHF. The handleSubmit function takes care of form submission and validation. When the user submits the form, the onSubmit function is called, where you can handle the form data as needed.
Adding Validation Rules
Form validation is a crucial aspect of building web forms to ensure that users provide valid and accurate data. With React Hook Form, form validation becomes incredibly easy and intuitive. The library offers a wide range of built-in validation rules and allows you to define custom validation logic with ease. In this section, we’ll explore how React Hook Form simplifies form validation.
Built-in Validation Rules
React Hook Form provides several built-in validation rules that you can apply to your form fields effortlessly. These rules cover common validation scenarios and save you from writing complex validation logic from scratch. Some of the built-in validation rules include:
- required: Makes a field mandatory, ensuring that the user fills it before submitting the form.
- min and max: Enforce minimum and maximum numeric values for number inputs.
- minLength and maxLength: Set minimum and maximum lengths for text inputs.
- pattern: Validate the field value against a regular expression pattern.
- email: Ensures that the input is a valid email address.
- url: Validates that the input is a valid URL.
For instance, to make a text input field required and restrict it to a minimum length of 5 characters, you can apply the required and minLength rules as follows:
<input type="text" {...register('username', { required: true, minLength: 5 })} />Custom Validation Logic
In addition to the built-in rules, React Hook Form allows you to define custom validation functions to handle more specific validation requirements. This feature gives you full control over the validation process and allows you to validate fields based on complex business rules. To define a custom validation function, simply pass a validation function to the register method. The function receives the field value as an argument and should return either true for a valid input or an error message as a string for an invalid input.
const validatePassword = (value) => {
  if (value.length < 8) {
    return 'Password must be at least 8 characters long';
  }
  // Return true for a valid input
  return true;
};

// Register the custom validation function for the "password" field
<input type="password" {...register('password', { validate: validatePassword })} />
Real-time Validation
React Hook Form enables real-time validation, meaning it can provide instant feedback to users as they interact with the form. Validation errors will be displayed as soon as the user leaves a field or submits the form.
By leveraging the formState object, you can access the validity status of each field and show error messages accordingly. For example:
const { formState } = useForm();
const { errors } = formState;

<input
  type="email"
  {...register('email', { required: true, pattern: /\S+@\S+\.\S+/ })}
/>
{errors.email && <span className="error-message">Please enter a valid email</span>}
With React Hook Form, you can effortlessly implement powerful form validation, significantly reducing the boilerplate code and complexity involved. This enables you to focus more on building a smooth user experience while ensuring data accuracy and integrity in your web forms.
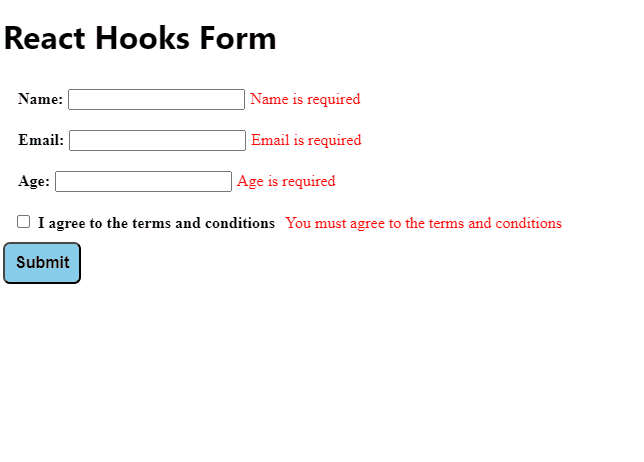
Let’s create a form with multiple fields
Below is a working example of a form with multiple fields using React Hook Form. In this form, we’ll have fields for the user’s name, email, age, and a checkbox to indicate whether they agree to the terms and conditions.
To run this code, make sure you have set up a React project and have installed React Hook Form using either npm as described earlier in the article.
import { useForm } from 'react-hook-form';

const MyFormComponent = () => {
  const {
    register,
    handleSubmit,
    formState: { errors },
  } = useForm();

  const onSubmit = (data) => {
    // Handle form submission here
    console.log(data);
  };

  return (
    <form onSubmit={handleSubmit(onSubmit)} className="my-form">
      <div>
        <label htmlFor="name">Name:</label>
        <input
          type="text"
          id="name"
          {...register('name', { required: 'Name is required' })}
        />
        {errors.name && (
          <span className="error-message">{errors.name.message}</span>
        )}
      </div>

      <div>
        <label htmlFor="email">Email:</label>
        <input
          type="email"
          id="email"
          {...register('email', {
            required: 'Email is required',
            pattern: {
              value: /\S+@\S+\.\S+/,
              message: 'Invalid email format',
            },
          })}
        />
        {errors.email && (
          <span className="error-message">{errors.email.message}</span>
        )}
      </div>

      <div>
        <label htmlFor="age">Age:</label>
        <input
          type="number"
          id="age"
          {...register('age', {
            required: 'Age is required',
            min: {
              value: 18,
              message: 'You must be at least 18 years old',
            },
          })}
        />
        {errors.age && (
          <span className="error-message">{errors.age.message}</span>
        )}
      </div>

      <div>
        <input
          type="checkbox"
          id="agreeTerms"
          {...register('agreeTerms', {
            required: 'You must agree to the terms and conditions',
          })}
        />
        <label htmlFor="agreeTerms">I agree to the terms and conditions</label>

        {errors.agreeTerms && (
          <span className="error-message">{errors.agreeTerms.message}</span>
        )}
      </div>

      <button type="submit">Submit</button>
    </form>
  );
};
export default MyFormComponent;
In this example, each input field has its validation rules defined using the register function from React Hook Form. When the form is submitted, the onSubmit function will be called, and the form data will be printed to the console. The formState object is used to access the form’s state, including any errors that occurred during validation.
![]()

