

In this article, we will go step by step from installing Visual Studio Code popular also known as Visual Studio Code to an IDE that is perfectly prepared for our upcoming React projects.
We will first start with the installation of Visual Studio Code. We can download Visual Studio Code from its official website, it is available for Mac, Windows, and Linux. It comes with built-in support for JavaScript, TypeScript, and Node.js and has a rich ecosystem of extensions for other languages (such as C++, C#, Java, Python, PHP, and Go) and runtimes (such as .NET and Unity).
To download Visual Studio Code visit the official site of Visual Studio Code to download as per the system we are using. Visual Studio Code is 100% free.
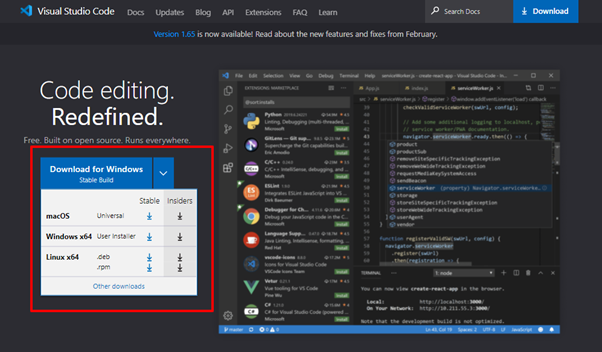
I would suggest downloading the latest stable build for your system as provided.
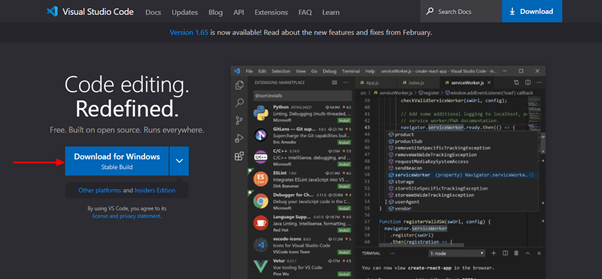
As soon as we click the Download for Windows button, the download will begin. Now follow double-click the downloaded file and follow the steps provided to install the Visual Studio Code.
By default, Visual Studio Code is installed under C:\Users{Username}\AppData\Local\Programs\Microsoft VS Code.
Note: Setup will add Visual Studio Code to your %PATH%, so from the console you can type ‘code .’ to open Visual Studio Code in that folder. You will need to restart your console after the installation for the change to the %PATH% environmental variable to take effect.
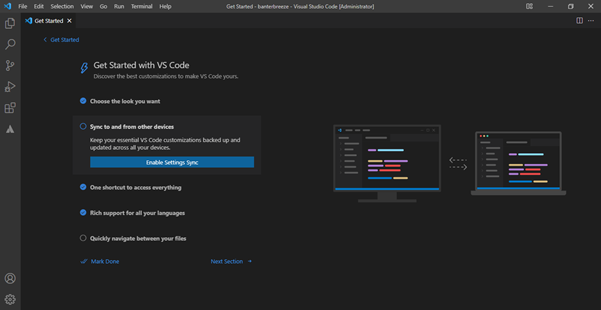
As our installation is done, opening the Visual Studio Code, we will be greeted with a home screen that looks something like this:
Selecting Color Theme
The default color theme provided by Visual Studio Code is Dark+ (Default Dark). The default theme provided is easy to read and with nice colors. But if we want then we can also install some third-party themes available and select any theme from those.
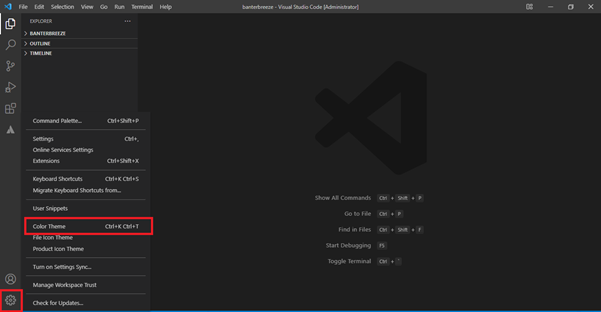
But before installing any third-party extensions, let’s check the themes provided by Visual Studio Code. Click on the settings icon provided at the left bottom corner. Clicking on that button will open a menu having various options.
Select the “Color Theme” option from the menu or else we can also use the command Ctrl + K Ctrl + T.
Clicking it will open a list of color themes available in the top middle section as shown in the image below.
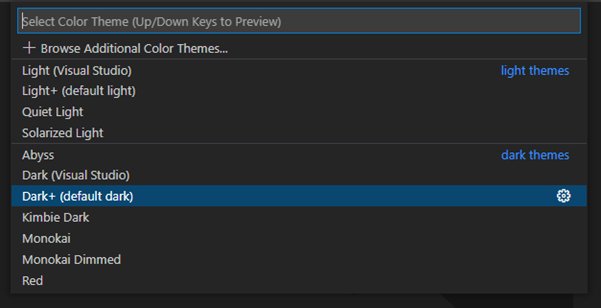
The default selected here is Dark+ as we can see as highlighted. We can select any as per our choice I personally use and highly recommend the Material Theme for all of my installations of Visual Studio Code.
Yes, this might seem like an unimportant thing to spend time on picking a theme. As we will be spending hours reading text in our editor, we should choose colors that we like and colors that do not strain our eyes.
We will install a third-party theme “Material Theme” so that we get some other theme options. In the next steps, we will install the extension in Visual Studio Code. To install the Material Theme, click on the icon that indicates the Extensions as shown in the image below or use the command Ctrl + Shift + X

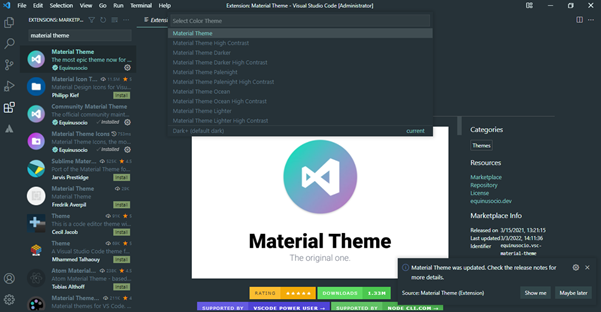
On clicking that icon a panel will open that lists all the popular and recommended extensions. Search for “Material Theme” in the sidebar and install the first result that comes up. On searching click on the first result that comes up and it will look something like this

Click on the install button to install this extension with Visual Studio Code. Once it has been installed it will give you a dropdown to choose between a bunch of different variants.
Once the extension is installed the theme will be changed automatically and a dropdown will open that lists all the themes provided by Material Theme. Once the extension is installed it will look something like
Changing Font settings
In Visual Studio Code, we can change the size of the fonts to the size that makes it easier for us to read. The default font size value that is set when freshly installing Visual Studio Code is 14. We can change it to the size that makes the code we write comfortable to read.
Let’s go through some settings that will improve the readability of our code are our font size, tab size, and font family.
To change our Visual Studio Code preferences, we need to click the settings icon at the left bottom corner and select settings from the menu or alternatively, we can also use the command “Ctrl +,”.
Settings I have found to be most comfortable for both desktop and laptop development are a font size of 16 and a tab size set to 4.
Remove Breadcrumbs
To remove/show the breadcrumbs we can go to View > Show Breadcrumbs, make sure it is unchecked for removing the Breadcrumb.
Making our code Prettier
Prettier is an excellent tool for formatting code, including React.js code. It helps maintain a consistent code style across your React projects, making it easier for developers to collaborate and read each other’s code. Here’s how to set up Prettier for your React.js projects:
Install Prettier
If you haven’t already, you need to install Prettier as a development dependency in your project. Open your terminal or command prompt, navigate to your React project folder, and run the following command:
npm install --save-dev prettierCreate a Prettier Configuration File (Optional)
Prettier can work without a configuration file, as it has sensible defaults. However, creating a configuration file allows you to customize Prettier’s behavior based on your preferences. To create a configuration file, add a .prettierrc file in the root of your project:
// .prettierrc
{
  "singleQuote": true,
  "semi": true,
  "tabWidth": 2
}
In this example, we’ve specified that Prettier should use single quotes, add semicolons, and use a tab width of 2 spaces.
Integrate Prettier with VSCode
To ensure that your code is automatically formatted with Prettier as you save your files in Visual Studio Code, you can add the “Prettier – Code formatter” extension. To install the extension, press Ctrl+Shift+X, search for “Prettier – Code formatter,” and click “Install.”
Once the extension is installed, you can enable “Format on Save” by adding the following setting to your VSCode settings (press Ctrl+, to open settings):
// settings.json
{
  "editor.formatOnSave": true
}
Now, whenever you save a React.js file, Prettier will automatically format the code according to the rules specified in your .prettierrc file.
Manual Formatting
You can also format your entire project manually using Prettier. In your terminal, run the following command:
npx prettier --write "src/**/*.js"This command will format all JavaScript files within the src folder and its subdirectories.
ESLint Integration (Optional)
Prettier and ESLint can work together to enforce both code formatting and coding style rules. You can use the eslint-plugin-prettier and eslint-config-prettier packages to achieve this integration. Install them by running:
npm install --save-dev eslint-plugin-prettier eslint-config-prettierThen, in your .eslintrc.js configuration file, add:
// .eslintrc.js
module.exports = {
  extends: ['plugin:prettier/recommended'],
  rules: {
    // Add any additional ESLint rules specific to your project
  },
};
With this configuration, ESLint will show formatting issues alongside other ESLint errors and warnings.
By following these steps, you can integrate Prettier into your React.js projects and maintain consistent and clean code formatting, which will help improve code readability and collaboration with other developers.
Some related articles
How to Create Toast Notifications in React with React Toastify?
Package.json Explained
Creating reusable components in React
How to use Bootstrap with React?
![]()


