

Create React App is an open-source tool created by Facebook that provides a simple and convenient way to set up a new React project. It allows developers to quickly create a new React application without the need to configure build tools, such as Webpack or Babel, manually.
Create React App uses a preconfigured template that includes everything needed to get started with React development, including a development server, build tools, and optimized configuration. With Create React App, developers can start coding their React components and features right away, without having to worry about the underlying build tools and configuration.
Create React App is a popular choice for developers who want to get started with React development quickly and efficiently, and it’s suitable for building small to medium-sized projects. It is also designed to work well with popular libraries and tools in the React ecosystem, such as Redux, React Router, and TypeScript.
Steps for getting started with Create React App
To get started with Create React App, you’ll need to follow these steps:
- Install Node.js: Create React App requires Node.js to be installed on your machine. You can download the latest version of Node.js from the official website (https://nodejs.org).
- Install Create React App: Once you have Node.js installed, open your terminal or command prompt and run the following command to install Create React App:
- npm install -g create-react-app
This will install Create React App globally on your machine.
- npm install -g create-react-app
- Create a new project: To create a new React project, navigate to the directory where you want to create the project in your terminal or command prompt and run the following command:
- create-react-app my-app
Replace “my-app” with the name of your project. This will create a new directory called “my-app” with all the necessary files and configurations to start a new React project.
- create-react-app my-app
- Start the development server: Once the project is created, navigate to the project directory by running the following command:
- cd my-app
Then, run the following command to start the development server: - npm start
This will start the development server and open the application in your default browser.
- cd my-app
- Start coding: With the development server running, you can start coding your React components and features in the “src” directory. Any changes you make will be automatically reloaded in the browser.
That’s it! You are now ready to start developing your React application with Create React App.
React Boilerplate
React Boilerplate is a popular open-source project that provides a foundation for building scalable, maintainable, and performant React applications. It is essentially a set of pre-configured tools, settings, and best practices that developers can use to quickly set up a new React project.
React Boilerplate includes a wide range of features, including:
- Pre-configured tooling: React Boilerplate comes with pre-configured build tools, such as Webpack and Babel, to make setting up a new React project easier.
- Folder structure: React Boilerplate includes a recommended folder structure for organizing your application code, making it easier to maintain and scale.
- React ecosystem integrations: React Boilerplate is designed to work well with other popular libraries and tools in the React ecosystem, such as Redux, React Router, and Jest.
- Code quality tools: React Boilerplate includes a range of code quality tools, such as ESLint and Prettier, to help ensure your code follows best practices and is easy to read.
- Server-side rendering: React Boilerplate includes support for server-side rendering, which can improve the performance and SEO of your React application.
React Boilerplate is a great choice for developers who want to start a new React project and are looking for a solid foundation on to build upon. It can save a lot of time and effort by providing a well-organized and pre-configured setup, allowing developers to focus on building their application’s unique features and functionality. However, it may not be suitable for small or simple projects, as its pre-configured setup may add unnecessary complexity.
Steps for getting started with React Boilerplate
To get started with React Boilerplate, you’ll need to follow these steps:
- Install Node.js: React Boilerplate requires Node.js to be installed on your machine. You can download the latest version of Node.js from the official website (https://nodejs.org).
- Clone the React Boilerplate repository: Open your terminal or command prompt and run the following command to clone the React Boilerplate repository from GitHub:
- git clone https://github.com/react-boilerplate/react-boilerplate.git
This will create a new directory called “react-boilerplate” with all the necessary files and configurations to start a new React project.
- git clone https://github.com/react-boilerplate/react-boilerplate.git
- Install dependencies: Once the repository is cloned, navigate to the project directory by running the following command:
- cd react-boilerplate
Then, run the following command to install the project dependencies: - npm install
- cd react-boilerplate
- Start the development server: Once the dependencies are installed, run the following command to start the development server:
- npm run start
This will start the development server and open the application in your default browser.
- npm run start
- Start coding: With the development server running, you can start coding your React components and features in the “app” directory. Any changes you make will be automatically reloaded in the browser.
That’s it! You are now ready to start developing your React application with React Boilerplate. You can customize the configuration files and add additional libraries as needed. React Boilerplate also includes a range of scripts for testing, building, and deploying your application, which you can learn more about in the project documentation.
React Starter Kit
React Starter Kit is an open-source project that provides a boilerplate for building scalable, performant React applications. It is a minimalistic and easy-to-use boilerplate that includes the bare essentials required to start building a React application, without any additional bloat.
React Starter Kit includes a number of features that make it easy to get started with building a React application, including:
- Pre-configured tooling: React Starter Kit comes with pre-configured build tools, such as Webpack and Babel, to make setting up a new React project easier.
- Server-side rendering: React Starter Kit includes support for server-side rendering, which can improve the performance and SEO of your React application.
- Recommended folder structure: React Starter Kit includes a recommended folder structure for organizing your application code, making it easier to maintain and scale.
- Code quality tools: React Starter Kit includes a range of code quality tools, such as ESLint and Prettier, to help ensure your code follows best practices and is easy to read.
- Pre-built components: React Starter Kit includes a set of pre-built components, such as navigation menus and form components, to help you get started with building your application faster.
React Starter Kit is a great choice for developers who want a minimalistic and easy-to-use boilerplate for building React applications. It is ideal for small or simple projects, as it does not include any unnecessary bloat or complexity. However, it may not be suitable for larger or more complex projects, as it does not include some of the more advanced features found in other boilerplates.
Steps for getting started with React Starter Kit
- To begin, we must clone the setup repository:
- git clone https://github.com/react-boilerplate/react-boilerplate.git
- my-react-boilerplate
- Run this setup script when entering the cloned repository:
- cd my-react-boilerplate
- npm run setup
- Then comes the start script, which starts the development server:
- npm start
This brings up the default homepage:
Vite
Vite is a build tool for modern web development that is designed to be fast, lightweight, and easy to use. It is particularly well-suited for building modern web applications using frameworks like React.
Vite provides a number of benefits over traditional build tools like Webpack. These benefits include:
- Fast build times: Vite uses a lightweight development server that makes use of native ES modules in the browser to provide near-instantaneous builds.
- No configuration required: Vite requires very little configuration out of the box, making it easy to get started with building a new project.
- Plugin-based architecture: Vite makes use of a plugin-based architecture that allows developers to easily extend its functionality with additional plugins.
- Support for TypeScript: Vite has built-in support for TypeScript, making it easy to build TypeScript-based React applications.
- Hot module replacement: Vite provides support for hot module replacement, which allows developers to see changes in their code in real time without the need to refresh the page.
Overall, Vite is a great choice for developers who want a fast, lightweight, and easy-to-use build tool for building modern web applications using React. It is particularly well-suited for small to medium-sized projects where fast build times are important.
Getting started with Vite
To generate the boilerplate, we just need to run the following command:
- Use the command to install Vite:
- npm create vite@latest
- After providing your “Project name,” you’ll be prompted to select a framework:
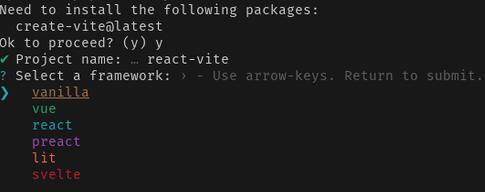
When you choose the React option, a new React project will be created in the directory. We must enter the directory and install the vite package as a dev dependency after the repository has been configured:
- cd react-vite
- npm install
Then, execute the following dev script:
- npm run dev
This brings up the default UI at 127.0.0.1:5173 or localhost:3000 depending on your Node.js/Vite version.
Conclusion
As we saw in the article above, there are so many Create React App alternatives and each has a unique set of advantages and disadvantages. So, while every alternative discussed in this article will work, it’s up to you to determine the best one for your project based on the requirement of your project.
![]()


